The iPhone 17 model includes materials built for both 3ds Max (V-Ray) and Blender (Cycles). Begin by selecting the renderer that matches your pipeline and check that all textures are linked correctly.
Material and Texture Setup
Screen Options: 11 screen textures allow for multiple presentation variants.
Detail Textures: Lenses, flashes, and grids add realism in close-up renders.
Color Variants: White, Black, Green, Blue, and Purple are included for marketing variety.
Lighting Tips
Studio Lighting
Use a clean three-point setup to highlight edges and maintain consistent reflections across the metallic and glass surfaces.
HDRI for Reflections
HDRI environments can help create soft reflections on the body while preserving screen clarity.
Optimization and Clean Topology
The model uses clean polygonal geometry with quads and tris. This makes it safe for subdivision, smooth shading, and close-up product shots.
By leveraging the ready-made V-Ray and Cycles materials along with the multiple texture sets, you can produce high-end iPhone 17 renders quickly and consistently across different pipelines.
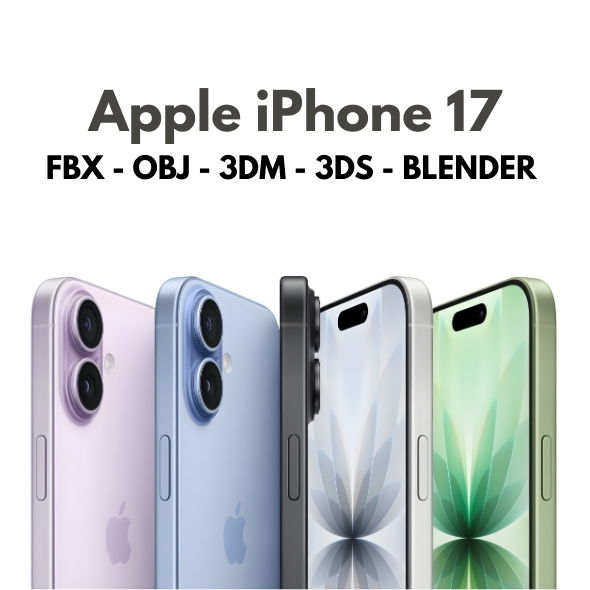
The Apple iPhone 17 3D Model is a highly detailed smartphone asset built for professional visualization. It ships with materials configured for 3ds Max (V-Ray) and Blender (Cycles), making it ready for production in both pipelines.
Key Features
All Colors Included: White, Black, Green, Blue, and Purple variants.
V-Ray & Cycles Ready: Materials configured for 3ds Max (V-Ray) and Blender (Cycles).
Clean Polygonal Geometry: Quads and tris for stable shading and easy edits.
UV Mapped: Reliable UVs for consistent texture placement.
Multiple Textures: Lenses, flashes, grids, and 11 screen options.
CAD Formats Included: Solid-state CAD formats plus optimized exchange files.
Use Cases
Product Visualization
Create high-impact product renders, marketing hero images, and e-commerce showcases.
Advertising & Animation
Use the model in commercials, motion graphics, and promotional campaigns with clean topology and accurate materials.
AR/VR Projects
Optimized geometry and multiple texture options make it ideal for immersive experiences.
With all color variants, V-Ray & Cycles-ready materials, and clean geometry, the Apple iPhone 17 3D Model is a versatile asset for professional visualization and marketing pipelines.
Accurate dimensions are critical for product visualization, especially for advertising and industrial design. The Apple iPhone Air 3D Model is built at real scale in millimeters, helping you maintain true proportions in every render and presentation.
Workflow Tips for Rhino NURBS Assets
Keep Units Consistent
Work in millimeters across Rhino, KeyShot, or your render engine to preserve real-world scale and avoid mismatch when placing the model in scenes.
Material Assignment
The model includes assigned materials and external textures. Import them into your renderer and fine-tune roughness and reflection for the specific lighting setup.
Use Color Variants
Showcase different color options (Space Black, Cloud White, Light Gold, Sky Blue) to create richer marketing visuals and A/B creative tests.
Format Compatibility
The package includes FBX (Binary), OBJ, 3DS, and STL. This makes it compatible with Rhino, Blender, 3ds Max, Maya, Cinema 4D, and most product visualization pipelines.
Best Use Cases
Advertising Renders: Photo-real hero shots with accurate proportions.
Marketing Mockups: Device showcases for landing pages and campaign creatives.
AR/VR Presentations: Scale-accurate assets for immersive product demos.
Industrial Design: Reliable reference geometry for design reviews.
With real-scale accuracy, clean NURBS geometry, and multiple export formats, the iPhone Air 3D Model is an ideal asset for product mockups and professional visualization workflows.
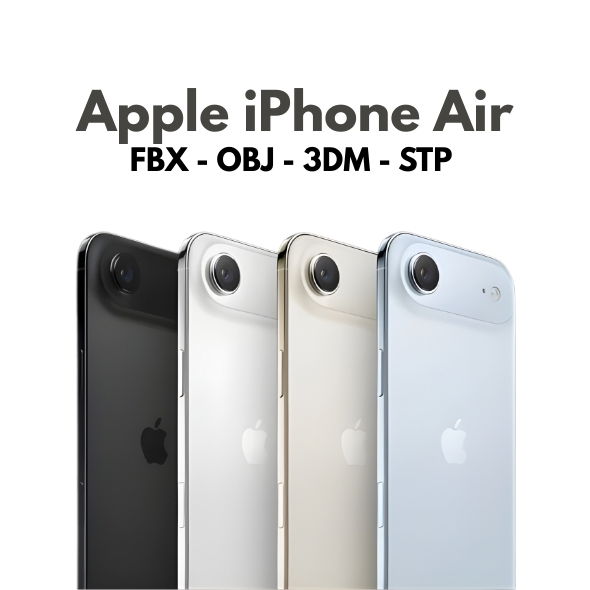
The Apple iPhone Air 3D Model is a high-precision asset created at real-world scale (millimeters) using Rhino with clean NURBS geometry. It is designed for accurate product visualization, advertising renders, and industrial design workflows where dimensional accuracy matters.
Key Features
Real-World Scale: Built in millimeters for accurate measurements (71.9 × 150.0 × 8.75 mm).
Rhino NURBS Geometry: Clean surfaces with no faceted geometry or n-gons.
UV Unwrapped: No UV overlaps for predictable texturing.
Assigned Materials: Materials and textures ready for rendering.
External Textures: Texture files included separately (no embedded textures).
Multiple Formats: FBX (Binary), OBJ, 3DS, STL.
Technical Specifications
Dimensions: 71.9 mm (W) × 150.0 mm (H) × 8.75 mm (D)
Colors: Space Black, Cloud White, Light Gold, Sky Blue
Formats: FBX (Binary), OBJ, 3DS, STL
Source: Rhino NURBS
Preview Renders: KeyShot 11
Perfect Use Cases
Product Visualization & Mockups
Create photorealistic device shots for brand presentations, product mockups, and marketing assets.
Advertising & Marketing Renders
Use real-scale geometry to maintain accurate proportions for commercial render pipelines.
AR/VR Presentations
Scale-accurate geometry makes this model ideal for AR/VR product demos and experiential content.
Industrial Design Workflows
Rhino-based NURBS geometry supports engineering-grade workflows and design iteration.
The Apple iPhone Air 3D Model combines real-scale accuracy, clean NURBS geometry, and production-ready materials. It is a reliable asset for professional visualization, marketing, and industrial design workflows.
PBR workflows provide consistent results across engines and renderers. The Moon model includes 4K Base Color, Roughness, and Normal maps, helping you achieve realistic lunar shading without heavy geometry.
Texture Setup
Base Color: Defines the lunar albedo and surface variation.
Roughness: Controls micro-surface reflectivity for realistic light response.
Normal Map: Adds crater and surface detail without additional polygons.
Lighting Tips
Directional Light for Sun Simulation
Use a strong directional light to mimic sunlight and reveal crater depth and surface relief.
Subtle Fill Light
Add a faint fill light or HDRI to avoid overly harsh contrast, especially for cinematic renders.
Real-Time Optimization
Use texture compression settings suitable for your target platform.
Keep the model as a single draw call where possible.
Leverage mipmaps and LODs for distant shots.
Software Compatibility
The Moon model works in Blender, Unity, Unreal Engine, 3ds Max, and other tools that support OBJ, FBX, GLTF, DAE, or STL formats.
With clean topology and high-quality PBR textures, the Realistic Low-Poly Moon model delivers reliable results for both real-time and cinematic workflows. It is a solid foundation for any space-themed visualization or interactive experience.
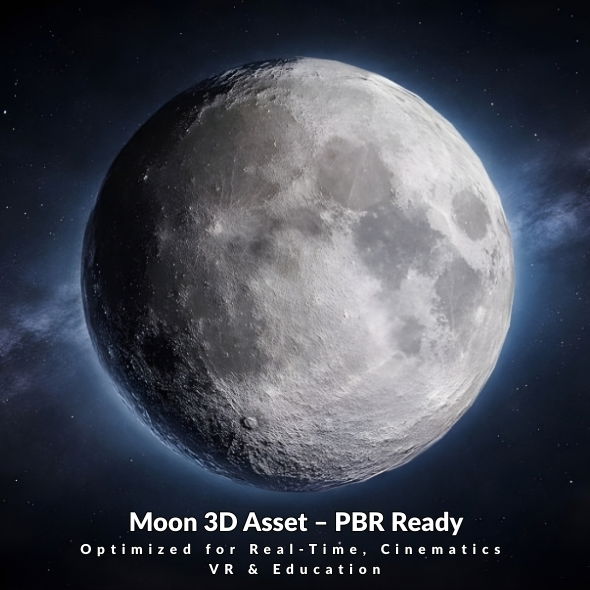
Introduction to the Realistic Low-Poly Moon 3D Model
The Realistic Low-Poly Moon 3D Model delivers detailed lunar surface representation with optimized geometry and a complete PBR texture set. It is designed for high-quality rendering and real-time applications, making it a versatile asset for games, VR/AR, scientific visualization, and cinematic space scenes.
Key Features
Low-Poly Optimized Geometry: Lightweight and efficient for real-time workflows.
4K PBR Textures: Base Color, Roughness, and Normal maps for consistent material response.
Clean UVs: UV unwrapped with no overlaps for reliable texturing.
Manifold Geometry: Clean topology with no N-gons for stable shading.
Engine Ready: Optimized for game engines and render engines.
Technical Specifications
Polygons: 2,048
Vertices: 1,922
Texture Resolution: 4K (PNG)
Shading: PBR
Formats: OBJ, FBX, GLTF, DAE, STL
Software: Created in Blender
Use Cases
Games and Real-Time Environments
Optimized geometry and PBR textures make the Moon model ideal for real-time engines like Unity and Unreal Engine.
Scientific Visualization
The accurate lunar surface representation works perfectly for educational and scientific content.
Cinematic Space Scenes
Great for sci-fi visuals, trailers, and space-themed cinematic renders where detail matters.
Compatibility
The model integrates smoothly into Blender, Unity, Unreal Engine, 3ds Max, and other software that supports the included formats.
With clean topology, 4K PBR textures, and optimized geometry, the Realistic Low-Poly Moon 3D Model is a reliable asset for real-time and cinematic pipelines. It is a perfect fit for space-themed projects requiring both performance and visual quality.
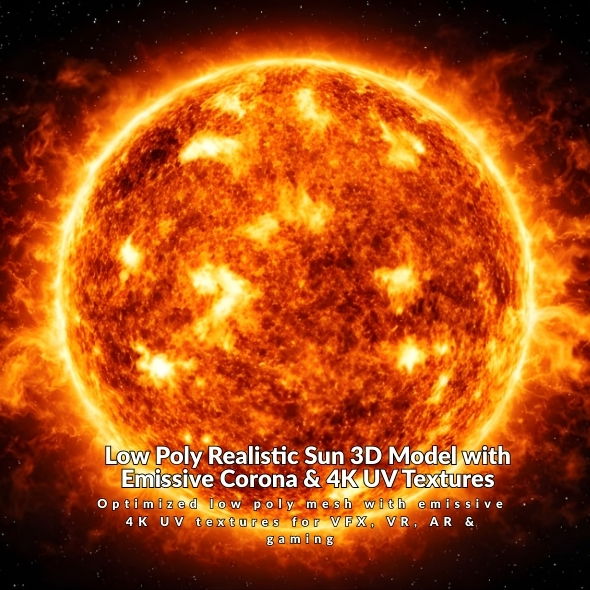
Creating realistic space scenes in real-time applications requires careful balance between visual quality and performance. The Low Poly Realistic Sun 3D Model is specifically designed for this challenge, offering authentic NASA-based textures and emissive materials while maintaining lightweight geometry that ensures smooth performance in real-time environments.
Performance Benefits of Low-Poly Geometry
Low-poly models offer significant advantages in real-time applications:
Reduced Polygon Count: Lower computational overhead for rendering
Faster Frame Rates: Maintains smooth performance even on less powerful hardware
Lower Memory Usage: More efficient memory footprint for mobile and VR applications
Better Scalability: Works efficiently across different platforms and devices
Optimized Textures: 4K textures provide quality without excessive memory usage
Integration into Game Engines
Unity Integration
For Unity projects:
Import the model via FBX or GLTF format
Use the emissive materials for realistic solar glow
Optimize texture import settings based on target platform
Consider using texture compression for mobile builds
Enable GPU instancing if using multiple sun instances
Unreal Engine Integration
For Unreal Engine projects:
Import via FBX or GLTF formats
Set up emissive materials in the Material Editor
Use appropriate texture compression settings
Consider LOD (Level of Detail) settings for distant views
Optimize material complexity for target platforms
Material Setup and Customization
Emissive Materials
The model includes realistic emissive materials for the solar glow:
Adjust emission intensity based on scene lighting
Modify emission color to match your artistic vision
Balance emission with other light sources in the scene
Use bloom post-processing for enhanced glow effects
PBR Material Workflow
For physically based rendering:
The model uses standard PBR material workflow
Compatible with modern rendering engines
Texture maps are optimized for PBR pipelines
Materials can be customized in your preferred software
Optimization Techniques
Texture Optimization
To optimize texture usage:
Use appropriate texture compression for your target platform
Consider texture streaming for mobile applications
Use mipmaps for distance rendering
Adjust texture resolution based on viewing distance
Geometry Optimization
Additional optimization tips:
The model is already optimized, but consider LODs for extreme distances
Use occlusion culling to avoid rendering when not visible
Consider frustum culling for off-screen objects
Use level of detail systems for complex scenes
Mobile and VR Considerations
Mobile Applications
For mobile development:
Use texture compression suitable for mobile GPUs
Reduce texture resolution if needed for lower-end devices
Optimize material complexity for mobile rendering
Test performance on target devices
Consider using simpler shaders for older devices
VR Applications
For VR development:
Maintain consistent frame rates (90Hz or higher)
Use efficient rendering techniques to avoid motion sickness
Optimize for both eyes rendering
Consider using single-pass rendering when available
Test on target VR hardware
Lighting Setup for Space Scenes
Scene Lighting
Effective lighting techniques:
Use the sun as a primary light source in space scenes
Balance emissive glow with directional lighting
Consider rim lighting to enhance the solar edge
Avoid over-lighting that competes with the emissive glow
Atmospheric Effects
For enhanced realism:
Add subtle lens flares for camera-facing views
Use bloom post-processing for enhanced glow
Consider depth of field for cinematic effects
Add subtle chromatic aberration if appropriate
Common Challenges and Solutions
Performance Issues
If experiencing performance problems:
Reduce texture resolution if needed
Simplify material shaders for lower-end platforms
Use LOD systems for distance optimization
Optimize post-processing effects
Visual Quality
To enhance visual appearance:
Adjust emission intensity for better glow
Use appropriate texture filtering
Enable post-processing effects like bloom
Balance material properties with scene lighting
Best Practices
Test performance on target platforms during development
Profile rendering performance to identify bottlenecks
Use appropriate level of detail based on viewing distance
Optimize textures and materials for your target platform
Balance visual quality with performance requirements
Resources and Support
Get started with the Low Poly Sun 3D Model by visiting our product page. View the interactive 3D preview and download the model in your preferred format.
Explore our complete 3D Models collection for more space-themed assets perfect for real-time applications.
Conclusion
Optimizing space scenes for real-time applications requires careful consideration of both visual quality and performance. The Low Poly Realistic Sun 3D Model provides an excellent foundation for creating stunning space environments in games, VR applications, mobile apps, and real-time rendering systems. By following best practices for integration, material setup, and optimization, you can create compelling space scenes that perform smoothly across different platforms and devices.
The Low Poly Realistic Sun 3D Model is a carefully crafted 3D asset that balances performance and visual quality. Featuring NASA-based textures, displacement maps, and realistic emissive materials with solar flare effects, this model delivers a cinematic appearance while maintaining a lightweight geometry structure ideal for real-time rendering applications.
Key Features of the Sun Model
This model stands out with its optimized design for modern 3D pipelines:
Low-Poly Optimized Geometry: Lightweight structure perfect for real-time rendering, mobile apps, VR applications, and games.
NASA-Based Textures: Authentic 4K UV textures and displacement maps based on NASA solar imagery for realistic surface details.
Realistic Emissive Materials: Emissive glow and solar flare effects that create a cinematic and believable appearance.
Clean UV Mapping: Professional UV unwrapping ensures textures map correctly and efficiently.
PBR Materials: Physically Based Rendering materials compatible with modern rendering engines.
Performance-Friendly: Designed for efficiency without sacrificing visual quality.
Technical Specifications
The model is optimized for performance and compatibility:
Formats Available: STL, OBJ, GLTF, FBX, BLEND
Textures: 4K UV Textures (NASA-based)
Materials: Emissive & PBR Materials
3D Printing: Not supported (designed for digital use)
UV Mapping: Clean, non-overlapping UVs
Ideal Use Cases
Space Scenes and VFX
Perfect for space scenes in films, documentaries, and visual effects. The realistic appearance and performance optimization make it ideal for both close-up renders and background elements in complex space environments.
Scientific Visualizations
Excellent for astronomy and physics content, educational media, and scientific presentations. The NASA-based textures ensure accuracy while the optimized geometry allows for smooth real-time interaction.
Mobile and VR Apps
The low-poly structure and optimized textures make this model perfect for mobile applications and VR experiences where performance is critical. The lightweight geometry ensures smooth frame rates even on less powerful devices.
Games and Real-Time Rendering
Ideal for game development and real-time rendering systems. The model balances visual quality with performance requirements, making it suitable for both indie and AAA game projects.
Educational Content
Perfect for educational applications, interactive learning experiences, and online courses about astronomy and space science. The realistic appearance enhances learning while maintaining interactive performance.
Advantages of Low-Poly Design
Why choose a low-poly model for your projects?
Performance: Faster rendering times, lower memory usage, and better frame rates in real-time applications
Scalability: Works efficiently across different platforms and devices
Flexibility: Easy to modify and customize for your specific needs
Modern Pipelines: Designed for contemporary workflows that prioritize efficiency
Software Compatibility
The model is compatible with major 3D software and game engines:
Blender: Full support with native BLEND format
Unity: Import via FBX or GLTF formats
Unreal Engine: Compatible with FBX and GLTF
Cinema 4D, 3ds Max, Maya: Import via FBX or OBJ
Real-Time Engines: Optimized for modern real-time rendering pipelines
Getting Started
Ready to integrate the Low Poly Sun 3D Model into your projects? Visit our product page to view the interactive 3D preview and download options.
You can also explore our complete 3D Models collection for more space-themed assets.
Conclusion
The Low Poly Realistic Sun 3D Model offers an excellent balance between visual quality and performance. With its NASA-based textures, realistic emissive materials, and optimized geometry, it’s perfect for modern pipelines that require efficiency without sacrificing visual quality. Whether you’re working on space scenes, VFX, games, mobile apps, VR experiences, or scientific visualizations, this model provides everything you need to create stunning solar representations in your projects.
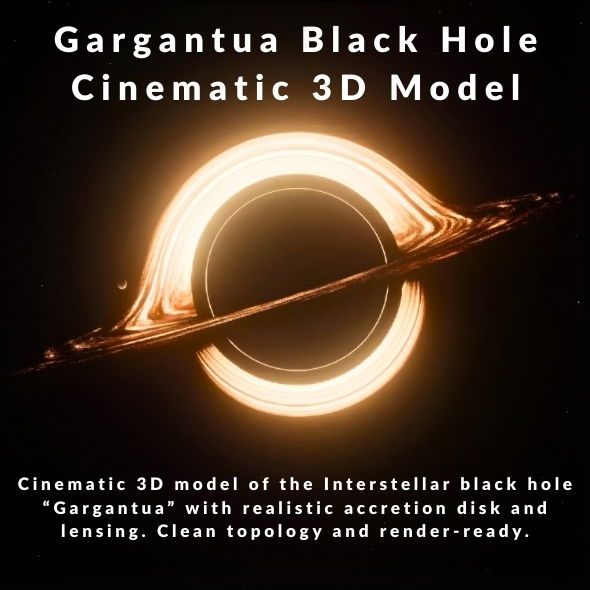
Working with the Interstellar Gargantua Black Hole 3D Model requires understanding how to leverage its shader-based accretion disk and gravitational lensing effects effectively. This guide covers the complete workflow from import to final render, ensuring you achieve stunning results in your projects.
Importing and Setup
Blender Import
For Blender users, the native .blend file includes:
Complete shader graph for accretion disk and gravitational lensing
Annotated nodes for easy customization
Optimized geometry with clean topology
Pre-configured Cycles render settings
Other Software Import
For other 3D applications:
Import FBX, OBJ, STL, ABC, or DAE files for geometry
Note that shader-based effects are Blender Cycles specific
Recreate materials using your software’s node system
Use the geometry as a base for custom shader development
Shader Graph Customization
Accretion Disk Setup
The accretion disk shader can be customized:
Colors: Adjust the color and gradient of the accretion disk
Size: Modify the radial extent and thickness
Brightness: Control overall intensity and emission strength
Rotation: Animate rotation for dynamic effects
Gravitational Lensing Configuration
To customize gravitational lensing effects:
Adjust distortion intensity nodes
Control the radius of the event horizon effect
Modify light bending parameters
Test different camera angles for optimal effect
Starfield Background
Customize the starfield:
Adjust star density for different background looks
Modify color tint to match your scene
Control brightness and distribution
Animate for dynamic backgrounds
Lighting Setup
Scene Lighting
For realistic black hole visualization:
Use subtle directional lighting to enhance the accretion disk
Avoid strong lights that overpower the emission effects
Consider rim lighting to define the event horizon
Test with different lighting setups for desired mood
Emission and Glow
The accretion disk uses emission shaders:
Adjust emission strength in shader nodes
Use post-processing glow effects for enhanced appearance
Balance emission with scene lighting
Test render settings for optimal glow appearance
Rendering Tips
Blender Cycles Settings
For best results in Blender Cycles:
Use Cycles renderer (required for shader effects)
Adjust sampling settings for quality vs. speed balance
Enable denoising for cleaner renders
Use appropriate light paths for emission materials
Test with different sample counts for optimal quality
Performance Optimization
To balance quality and render time:
Adjust sampling settings based on final output resolution
Use denoising to reduce required samples
Optimize shader complexity if needed
Render in passes for compositing flexibility
Use progressive rendering for preview renders
Animation Workflows
Accretion Disk Animation
For animated sequences:
Animate accretion disk rotation for dynamic effects
Use shader node animation for color changes
Keyframe brightness and intensity parameters
Create slow rotation for subtle motion
Camera Movement
Effective camera techniques:
Use slow camera movements around the black hole
Experiment with different angles to showcase lensing
Consider orbital camera paths for cinematic shots
Use depth of field to enhance depth perception
Post-Processing and Compositing
Color Grading
Enhance your renders in post:
Adjust contrast to enhance the event horizon
Use color grading to match your project’s aesthetic
Enhance emission glow in compositing if needed
Add subtle lens effects for realism
Glow and Lens Effects
To enhance black hole appearance:
Add glow effects to the accretion disk in compositing
Use lens flares for light interactions
Enhance gravitational lensing distortion in post if needed
Add subtle chromatic aberration for realism
Common Challenges and Solutions
Shader Effects Not Visible
If shader effects don’t appear:
Ensure you’re using Blender Cycles renderer
Check that shader nodes are properly connected
Verify material assignment to the geometry
Test with different camera angles
Performance Issues
If rendering is slow:
Reduce sampling settings for preview renders
Use denoising to allow lower sample counts
Optimize shader complexity if needed
Render at lower resolution for previews
Resources and Support
Get started with the Interstellar Gargantua Black Hole 3D Model by visiting our product page. Watch the preview video and download the model in your preferred format.
Mastering the workflow for the Interstellar Gargantua Black Hole 3D Model opens up endless possibilities for cinematic rendering, scientific visualization, space CGI, and VFX projects. By understanding shader customization, accretion disk setup, gravitational lensing configuration, and rendering optimization, you can create stunning black hole visualizations that captivate audiences and enhance your creative projects.
Introduction to Interstellar Gargantua Black Hole 3D Model
The Interstellar Gargantua Black Hole 3D Model is a detailed recreation of the supermassive black hole Gargantua from Christopher Nolan’s film Interstellar. This high-quality 3D asset includes a fully shader-based accretion disk and gravitational lensing simulation designed for Blender Cycles, making it perfect for cinematic rendering, scientific visualization, space CGI, VFX, and educational media.
Why Choose This Gargantua Black Hole Model?
This detailed black hole model offers numerous advantages for 3D artists, filmmakers, and scientists:
Accretion Disk Simulation: Fully shader-based accretion disk with customizable colors, size, and brightness
Gravitational Lensing: Realistic simulation of light bending around the event horizon
Annotated Shader Nodes: All nodes are annotated for easy customization and adjustment
Configurable Starfield: Customizable starfield background with adjustable density and color tint
Cinematic Quality: Optimized for professional VFX and film production
Scientific Accuracy: Based on scientific principles and the visual design from Interstellar
Technical Specifications
The Gargantua model features impressive technical details:
Polygons: 6,662 polygons for optimized performance
Vertices: 4,016 vertices with clean topology
UV Mapping: Unwrapped, non-overlapping UV mapping
Shader Setup: Fully configured shader graph for Blender Cycles
3D Printing: Not supported (designed for rendering)
Available Formats
The Gargantua black hole model is available in multiple formats:
BLEND (primary): Native Blender scene with full shader setup
OBJ: Geometry-only format for import into other software
FBX: Universal format for most 3D applications
STL: Standard format for 3D applications
ABC: Alembic format for animation workflows
DAE: Collada format for interchange
Software Compatibility
The native scene is created in Blender using Cycles renderer. For correct rendering and physical simulation:
Blender Cycles: Recommended for full shader-based effects
Other 3D Software: Geometry can be imported via FBX, OBJ, STL, ABC, or DAE
Note: Shader-based effects (accretion disk and gravitational lensing) are specific to Blender Cycles
Use Cases
Cinematic Rendering
Perfect for space documentaries, sci-fi films, title sequences, and broadcast graphics. The realistic accretion disk and gravitational lensing create stunning visual effects that match the quality seen in Interstellar.
Scientific Visualization
Ideal for astronomy projects, planetarium content, and educational materials. The scientifically-inspired design helps explain black hole physics and visual phenomena.
Space CGI and VFX
Excellent for sci-fi cinematics, concept art, matte painting, and space-themed VFX. The customizable shader setup allows for creative adaptations while maintaining realism.
Educational Media
Perfect for educational videos, documentaries, and interactive learning materials about black holes and astrophysics.
Shader Setup and Customization
The shader graph is configured to simulate relativistic light bending around the event horizon. All nodes are annotated for easy customization:
Accretion Disk Colors: Customize the color and intensity of the accretion disk
Disk Size: Adjust the size and extent of the accretion disk
Brightness: Control the overall brightness and intensity
Gravitational Distortion: Adjust the intensity of gravitational lensing effects
Starfield Background: Customize star density and color tint
The Interstellar Gargantua Black Hole 3D Model provides everything you need for cinematic rendering, scientific visualization, space CGI, and VFX projects. With its realistic accretion disk simulation, gravitational lensing effects, and fully customizable shader setup, this model delivers the quality and authenticity required for professional projects and creative endeavors.